Etiquette
To help everyone have a good experience in a virtual meeting, here are a few tips and points of etiquette to keep in mind:
- Make sure anyone else in your area knows that you’ll be joining a meeting – respect their privacy!
- Not everyone wants to be heard or seen by strangers!
- Not every stranger wants to accidentally see your scantily clad roommate / housemate!
- If you have a microphone:
- Please check your microphone in the preview window before joining your meeting.
- Please keep your microphone muted unless you’re actively using it to talk, share music, etc.
- Microphones tend to amplify background noises so that they sound louder to everyone else than they do to you.
- More open microphones increases the possibility of echo and feedback.
- If the meeting facilitator notices that your microphone is open and you’re not currently using it, they might mute you. Please don’t take offense! They’re just trying to help the meeting go smoothly!
- If you have a camera:
- Please check your camera view in the preview window before joining your meeting. Make sure you’re happy with what others will see; maybe put away the evidence of any recent crimes!
- If you’re comfortable with it, please turn on your camera when you’re talking. It’s nice socially but it also helps people understand what you’re saying and how you’re saying it if they can see your face. This goes double for humor and sarcasm!
- Please have patience! This is new for a lot of people, and technological gremlins can strike even the most confident techno-wizards.
Quick Start
- Optionally, download and install “Zoom Client for Meetings” from one of these links:
- Windows / Mac: https://zoom.us/download
- Linux: https://zoom.us/download?os=linux
- Android: https://play.google.com/store/apps/details?id=us.zoom.videomeetings
- iPhone / iPad: https://itunes.apple.com/us/app/id546505307
- Click the link for your meeting. You should be taken to a page like the image below.
- If you already have Zoom installed you might see an option to open it directly. Choosing that is the fastest way to get into the meeting.
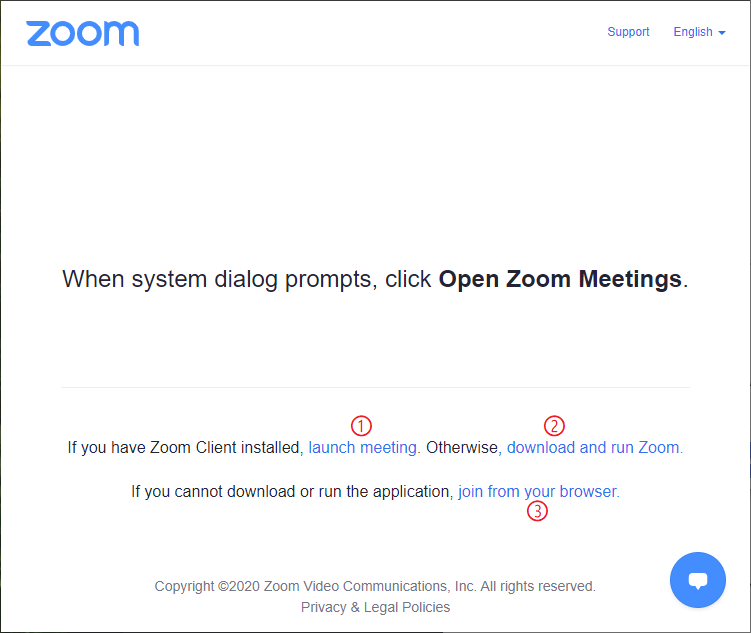
- Choose how you’d like to join:
- Using the Zoom Client application is most reliable and flexible, but it requires downloading and installing the Zoom Client.
- If this is your first time joining a Zoom meeting, you may not have the Zoom Client installed. If that’s the case, or if you’re not sure, click the link to “download and run Zoom” (near ② in the screenshot above). Depending on your system, you may need to come back to this page after installing Zoom.
- If you already have Zoom installed, pick “launch meeting” (near ① in the screenshot above). This should take you straight to the meeting.
- The “join from your browser” option is quick and easy, but some people have trouble using their camera or microphone with this option, and some features of Zoom might not be available. If you want to go with this option, pick the “join from your browser” link (near ③ in the screenshot above).
- Using the Zoom Client application is most reliable and flexible, but it requires downloading and installing the Zoom Client.
- If you are prompted for a name, enter a name that the members of the Barony will recognize. It doesn’t have to be your full SCA or modern name.
- You should then end up on a screen similar to these:
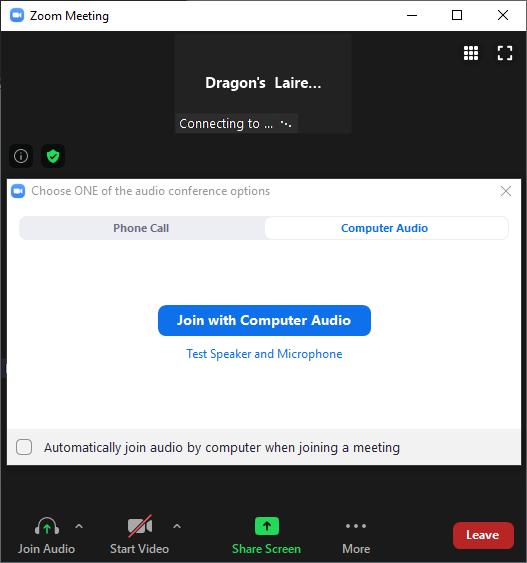
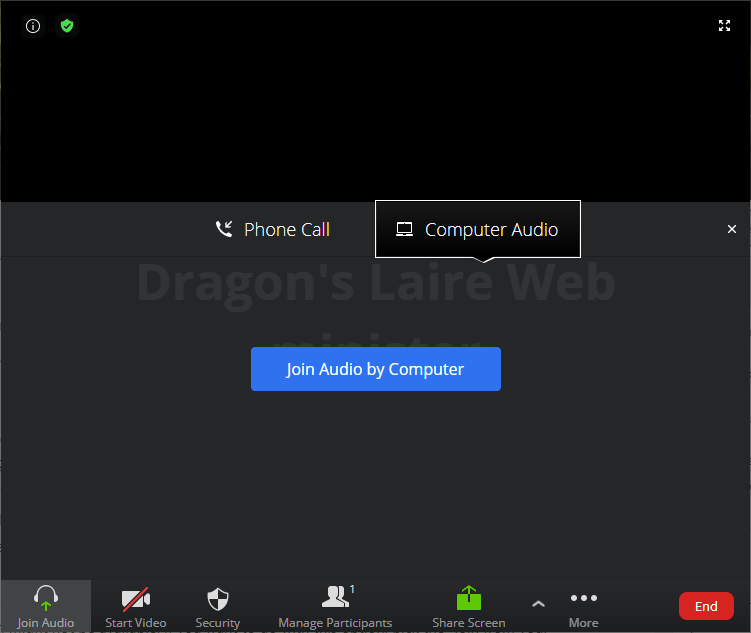
- Pick “Join with Computer Audio” or “Join Audio by Computer” to use your computer’s speakers and microphone.
- Once you’ve joined, use the buttons described in the next section to control your experience.
- Once you’re done, pick “Leave” or “End” or close the program.
Controls During a Meeting
The buttons along the bottom of Zoom can be used to control your settings and interact with the meeting. The controls may vary depending on your version of Zoom, the meeting settings, and your role in the meeting, but they should look something like this:

From left to right:
- Pick “Mute” or “Unmute” to turn your microphone on or off. Ideally, please stay on mute most of the time unless you’re actively speaking or sharing, since these meeting programs are great at picking up and amplifying background noise.
- Pick the small up-arrow near the Mute / Unmute button to control your audio settings. For example, if Zoom is using the wrong speakers or microphone, you can change that here.
- Pick “Start Video” or “Stop Video” to turn your camera on or off.
- Pick the small up-arrow near the Start / Stop Video button to control your camera settings, including choosing a virtual background.
- Pick “Security” to change meeting settings which affect everyone.
- Pick “Participants” to hide or show the list of people in the meeting.
- Pick “Chat” to hide or show the text chat attached to the meeting. You can use this to share messages if you can’t or don’t want to use a microphone, or if you don’t want to interrupt the main conversation.
- Pick “Share Screen” to share an application on your computer, or your whole screen. You might use this if you want to give a presentation, for example.
- Pick “Record” to start or stop recording the meeting.
- Pick “Breakout Rooms” to interact with side-rooms in the meeting. Not all meetings have breakout rooms.
- Pick “Reactions” if you want to react to something that someone said or did with applause or a thumbs-up.
- Pick “End” to leave the meeting.
Hosting & Co-Hosting
If you’re acting as a Host or Co-Host on Zoom, your main job is to make sure things are going smoothly. To do this, you:
- Help people get to the correct breakout rooms,
- Remove disruptions (“Zoom bombs” and the like),
- Ask people to unmute if you notice they’re trying to trying to talk to the group while muted,
- Mute people when necessary, and
- Otherwise act like another attendee and enjoy the meeting / event!
You should also make sure you have the latest version of the Zoom app, since some hosting duties don’t work on the web site version. You can download the app here:
- Windows / Mac: https://zoom.us/download
- Linux: https://zoom.us/download?os=linux
- Android: https://play.google.com/store/apps/details?id=us.zoom.videomeetings
- iPhone / iPad: https://itunes.apple.com/us/app/id546505307
Breakout Rooms
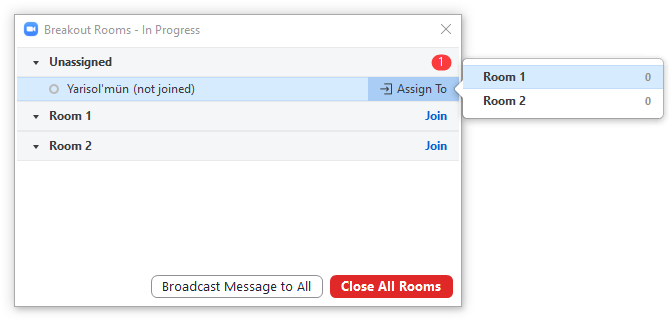
Helping someone move to a breakout room is the most important service a Host or Co-Host can provide, since some versions of Zoom don’t allow a participant to do it themselves even when the meeting is set up to allow that. Specifically: all versions of Zoom allow a participant to join and leave a breakout room once assigned, but some versions of Zoom don’t allow a person to assign themselves to a room.
If a person asks to move to a breakout room:
- Press the “Breakout Rooms” button (might be under “More…”)
- Find the person who wants to move to another room
- Press “Assign To” button for that person (might be hidden until hover)
- Choose the room they would like to join
Removing Disruptions
If someone is intentionally disrupting the meeting:
- As a first step you might want to mute the individual to reduce the disruption while you follow the rest of these steps
- Click on the “…” on their portrait or the “More” button on their entry in the participants list
- Pick “Remove”
- This will pop up a small dialog. If you’re in a hurry (the person is being extra disruptive or offensive) make sure the “Report” box is checked and pick “I’ll tell you later” — in a case like this it’s more important to be fast than to fill in details now.
- If this keeps happening in a particular meeting, turn on the waiting room so you have a chance to remove disruptions before they join. You can turn on the waiting room through the “…” menu in the Participants pane.
Asking a participant to unmute
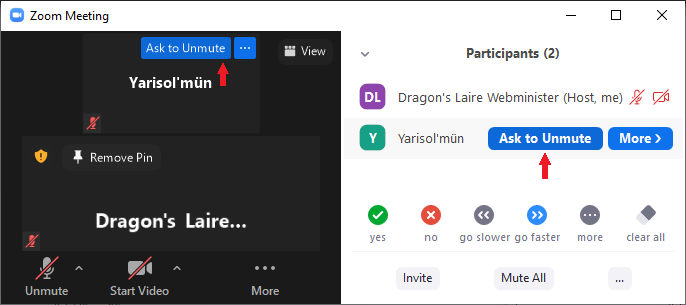
If you notice that someone seems to be trying to speak to the group, but they’re muted, you can ask them to unmute. This is just like muting someone but in reverse.
In some cases you may be able to unmute someone directly instead of asking them to unmute. Be very careful with this as unmuting someone who is holding a personal conversation may cause them to share private information with the group.
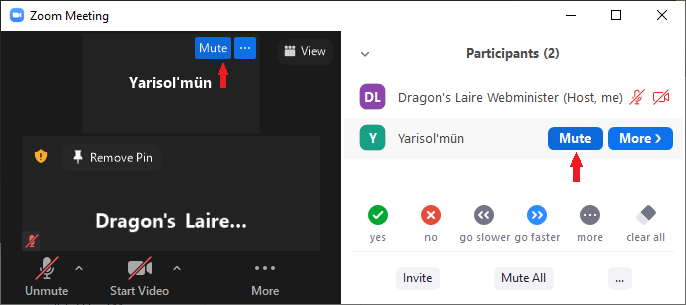
The “Ask to Unmute” button can be found near the person’s portrait or in the participants list. These buttons may be hidden until you move your mouse over them.
Muting a participant
People should generally mute themselves if they’re not actively sharing, but depending on the situation it might not be important to be strict about that. In an open conversation it’s not unusual for people to leave themselves unmuted and that’s usually OK. In a class or presentation, or in Court, we might want to be very proactive in muting anyone but the presenters. It’s a judgment call.
The most important times to mute someone are:
- if they are accidentally sharing a personal conversation with the group,
- if they are talking over someone who “has the floor” such as in a class or in Court, or
- if they are transmitting background noise (TV, barking dogs, appliance or tool noises, etc.).
The “Mute” button replaces the “Ask to Unmute” button when someone is sharing audio. Again, these buttons may be hidden until you move your mouse over them.